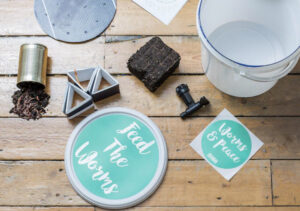
My Ferme Du Moutta worm bin costs around £90, but lower-priced options are available. The idea of a worm bin is to convert organic food waste into nutrient-rich soil conditioner and liquid feed using worms designed for this purpose. You will find various worm bins online – this article shows you a small starter tub, and the option to convert your wheelie bin or make your own using downloadable plans. I love worm composting, and it contributes to green living, reducing food waste going to landfill.
What you need to start a worm bin:
- Worm bin or plastic tub
- Red Tiger Worms or European Nightcrawlers
- Coir bedding or a mixture of shredded newspaper
- Extra newspaper, cardboard, straw or dry grass for carbon-ruch material
- Uncooked fruit and vegetables, tea bags (non-plastic), coffee grounds for nitrogenous material
- Crushed eggshells to add grit to their diet
- The environment must not be wet or too dry
If squeamish, investing money in a worm bin and accessories is pointless because you’ll need to handle the worms, turn the soil and food contents to create oxygen for the worms to survive, and harvest castings. My article Starting a Worm Bin can give you an idea of what to expect. Alternatively, Bokashi composting (without worms) is an option, too. I run both. Food my worms cannot eat goes into my Bokashi bin.
Subscribe and Follow The Worm Gang on YouTube
Learn Bokashi Composting on YouTube
Maintenance for your worm bin:
- Avoid coloured magazines, meat, dairy, oily food, citrus, bones, spice or fat, onions, garlic, leeks – use in your Bokashi bin instead
- Lay the food scraps in a layer of shredded or full-sheeted black newspaper or cardboard
- Lay a hemp coir mat on top of the food to absorb moisture in the bin; it will disintegrate and be eaten by your worms
- If you have a DIY one-system bin, make sure the bedding is moist but not too wet
- Keep your wormery away from direct sunlight
- If ventilation holes are at the top of your wormery, lay something across the top to avoid too much rainwater getting inside
- If the worms are clinging to the side of your wormery – anywhere except in the bedding – your worms are unhappy. It could mean the bedding is too wet or acidic conditions
- Insulate your wormery in the Winter
Caring for your wormery is vital to achieving healthy worms – I’ve made mistakes, learnt from them, and passed them on in articles and my YouTube videos.
Table of Contents:
- 10-litre readymade worm tub
- 3-tier worm composting bin plan
- 3-bin system family-size DIY worm bin plans
- Colourful mini worm tower
- Beginners guide to starting a wormery
“Shop confidently on Etsy knowing if something goes wrong with an order, we’ve got your back for all the eligible purchases.”
etsy
1: 10-litre readymade upcycled worm bin and kit
Key features:
- Ideal for beginners
- Includes bedding and worms
- Upcycled container
- Help on hand
“…perfect starter kit for me. It fits nicely on a kitchen shelf, perfect for food waste….we haven’t spotted any escapees and they are composting on the food nicely…it’s a great little science project for the kids too.”
Martin
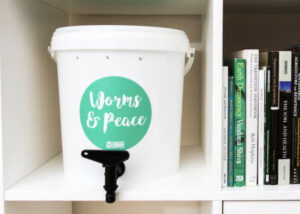
The 10-litre worm tub is very popular with excellent reviews. It is small and perfect for someone starting a worm composting. Drain the liquid feed from the tap and remove the castings inside the tub. You’ll notice ventilation holes around the top – these are vital because the worms need to breathe.
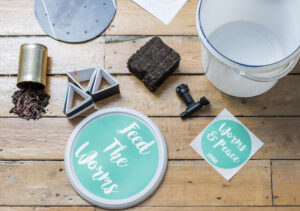
Kit includes:
- Container 23cm wide x 26cm high
- 1 x tap
- 1 x upcycling drainage tray & legs
- 100g Tiger Worms
- ‘Worm & Peace’ sign
- Worm Care booklet
Urban Worm suggests keeping your worm tub in the kitchen, but from my experience with the Ferme Du Moutta wormery indoors on the first night, worms escaped. Your new composting worms need to settle into their new environment, so help them by adding their travel soil into the new coir bedding. A few will escape so I recommend storing you bin outside or in a garage but protected from weather conditions. Don’t forget to rescue any worms and return them to your bin. A shed will be too hot in the spring and summer. Originally, my bin was stored in the corner of the house – the walls formed a U-shape.
Buy from The Urban Worm on Etsy
Buy more worms and accessories from Wiggly Wigglers and receive a £2.50 coupon
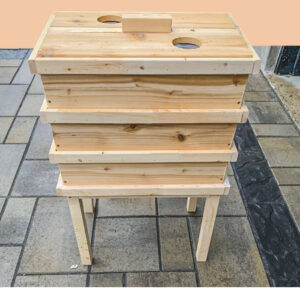
2: Do-It-Yourself 3-tier worm composting bin plans
Key features:
- Downloaded plans by PDF
- Costs £4.64
- Step by step easy to follow instructions and photographs
- Full list of tools
- Full cut guidance
- Full shopping list for materials
“I am not an experienced wood worker but this project was very manageable and the finish work looks good.”
Kori
The reviews highly regard the easy-to-follow plans, with the wormery suitable for both novice and experienced to build. A tool, material and guidance list are included too. And for those preferring visual instructions, a photograph set is in the kit. Cedar is the desired wood but a few people have opted for pine.
Another buyer offered the following advice when cutting the short cross beams.
Warning: “I would warn others to not cut your final short beams (on the outside) until you are ready to apply them because the measuremant given was too short for the wood I used (ie 13.5″ vs 14.1″).”
Kori
Buy from Planted in the Garden on Etsy
Buy your Start Up Pack (coir bedding, worms, feed and instructions) from Yorkshire Worms, or try Wiggly Wigglers and receive a £2.50 coupon
3: Do-It-Yourself family-size 3-bin worm bin plans
Key features:
- Downloaded plans by PDF
- Costs £5.24
- The file contains details of everything you need
- Information about how to start and how to harvest
- Advise choosing the correct size bin
- Store in a garage or outside
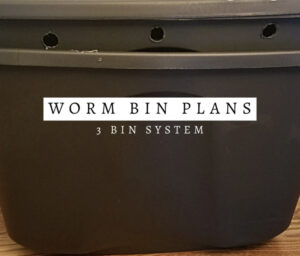
“It turns out I have most of the supplies to make this already, just need to buy the worms! I appreciate the sustainability of being able to use household objects to enhance any gardening efforts.”
Red Meg the Avenger
Overall, the online store has a massive 786 sales. The purchase is for downloadable plans, including recommendations for the bin size needed to build a 3-tier system, materials required, how to start, harvest, and how and where to drill ventilation holes for airflow.
Buy from Elm Dirt on Etsy
Buy the composting worms or worm kit from Yorkshire Worms, or try Wiggly Wigglers and receive a £2.50 off coupon
4: Colourful mini worm tower
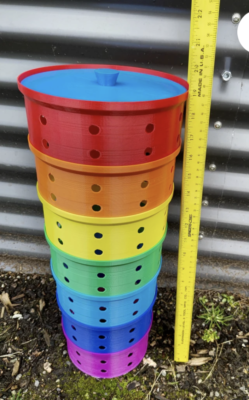
Key features:
- Available in rainbow colours or blue
- Compost will attract worms already in your garden
- It does not suggest buying compost worms
- It does not include a drainage insert and tap, or a bedding insert
- Height 21 2/3″
- Diameter 7 to 5″ (narrows slightly at the top)
- The rainbow version is about 19″
- An alternative idea is a plant pot!
- If you love quirky, this is for you!
“Place in the centre of your raised bed. Drop your apple cores, banana peels, watermelon rinds and other compostables into the worm tower.”
Seller: Burunchi
Two colours are available: rainbow with a height of 19″ and a blue tower with a height of 21 2/3″. This design is used differently. The quirky tower is placed on a raised bed, or similar, where you want the soil to be fertilised. Remove the lid and fill it with compostable foods.
This version is not really for composting worms, so it offers an alternative and will attract earthworms. However, you have the option of buying compost worms and adding to the rainbow bin. Another alternative is combining its use with your Bokashi bin and mixing in fermented food waste with other natural materials.
Recommended organic food:
- Apple cores
- Banana peels
- Watermelon rinds
Don’t forget: remove the seeds to prevent germination.
“I’m using it for more than a year in a raised bed in PNW climate, and have great cherry tomatoes, amazing Swiss chard, onions. This could also be suitable for placing directly into a garden bed soil.”
Seller: Burunchi
The organic fertiliser will feed you plants, fruit and vegetables. The designs differ because it doesn’t have a drainage tap or tray, and you don’t have to use composting worms or coir bedding, but as the seller says, it “makes an excellent gift for someone who loves gardening.”
Buy from Burunchi on Etsy
Related content:
- Beginners: Starting a Wormery and Vermicomposting
- Watch: The Worm Gang playlist on YouTube
- Ferme Du Moutta & WormBox – various worm composters
- US customers: Buy a wormery starter kit
- US customers: Buy composting worms (Sale)
- UK customers: Starter kit (worms, bedding & feed)
5: Do-It-Yourself wheelie bin worm farm kit
Key features:
- Plans available to convert bin sizes: 80l, 120l & 240l wheelie bins into a worm farm
- Or purchase a complete worm farm: wheelie bin set up as a worm farm
- Repurposed ‘for sale’ signs used for drainage trays & legs
- Kit includes physical materials
- Brackets & harvesting are recycled plastic
- Coconut coir and manure brick included
- Worms excluded
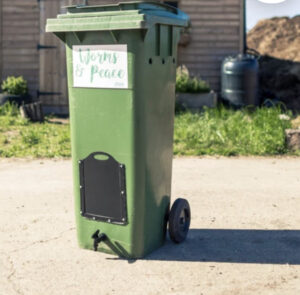
The Urban Worm offers two choices:
- Repurposed secondhand wheelie bin worm farm for £79
- Wheelie bin do-it-yourself worm farm kit for £47
Firstly, if you opt for the kit, I do not know how it stands with your local council about converting your wheelie bin into a worm bin, even if it reduces landfills.
The kit supports converting wheelie bin sizes 80l, 120l and 240l, and includes repurposed ‘for sale’ signs for the drainage trays and legs and a harvesting window and brackets manufactured locally.
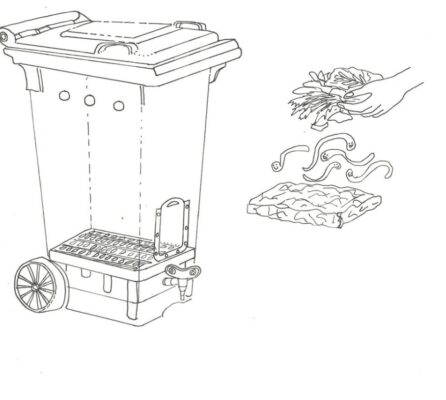
The kit includes the following:
- 2 x Plastic corrugated sheets (repurposed For Sale signs)
- 1 x Tap
- 8 x Nuts, bolts, washers
- 5 x Zip ties
- 1 x Paper Template
- 1 x ‘worm & peace’ sticker
- 1 x Organic cotton bag
- 1 x Hessian bag
- 2 x Brackets
- 1 x Harvesting window
- 1 x Coconut coir
- 1 x Manure brick (from rescue horses)
- 1 x Worm care guide
All you need to convert your wheelie bin are the following:
- 1 x Drill
- 1 x Electric jigsaw
- 1″ hole saw
- 1 x Sharp scissors
- 1 x Marker pen
Buy the plans from The Urban Worm on Etsy
Buy the composting worms or worm kit from Yorkshire Worms, or from Wiggly Wigglers
5: Beginners Guide to Starting a Worm Farm
Before buying a worm bin, why not order a downloadable guide and see what it’s all about, how to care for your wormery and worms, and the end results? Or follow my Worm Gang playlist on YouTube, or other green living articles.
An example of contents:
- What you need to create a worm farm
- What type of container is needed
- What is the bedding used
- Good and bad waste for your worm farm
- Why glossy paper is bad for your wormery
What you will learn:
- How composting affects vegetables and fruit scraps
- Why your bedding should not be too wet
- The benefits of aeration
- Why you need oxygen for your worms
- Why do you need a carbon and nitrogen balance
Buy from How To Books on Etsy
Poppy’s Pets has a column in the Withernsea District & Community News, and actively takes part in worm composting and Bokashi.

