Starting and maintaining a wormery can be confusing at first, but as you progress you learn new ways of taking care of your wormery and keeping your worms safe so they provide castings and leachate (liquid) for your garden. Whether you are an eco-conscious gardener or want to recycle food scraps into nutrient-rich fertiliser for your plants, worm composting is a fantastic way of green living. Miniature wormeries are available for balcony composting too.
Worm composting is sustainable and is also known as vermicomposting. One of the benefits is reducing waste, and another is lowering your ecological footprints. You are creating a natural source and with the help of special worms, turning waste food into soil and plant conditioner that will help them grow more robust and flourishing shrubs, plants and vegetables.
Starting a wormery for the first time can feel confusing, but following guidance and practice, you’ll soon get the hang of it. You do not have to spend lots of money on a worm bin. You can make your own or purchase a smaller bin.
Keeping your wormery and worms healthy in their environment is vital so let’s explore points I have learnt from owning a wormery.
Table of Contents:
- What is a wormery and its benefits?
- What type of worms suit composting?
- What is safe and prohibited food waste?
- How often should I feed my worms?
- How and when to harvest worm castings and worm tea
- Troubleshooting
- Storing a wormery in the Autumn and Winter
- Storing a wormery in the Spring and Summer
- End note
What is a wormery, how does it work, and what are the benefits?
A wormery is a container used to create vermicompost, a process using composting worms to decompose food scraps into nutrient-rich compost and liquid feed for the garden and indoor plants.
- Worm castings are from whatever passes through a composting worm
- Vermicomposting is a mix of decomposed organic waste and worm castings
It can take several weeks or months to achieve either, so patience is required.
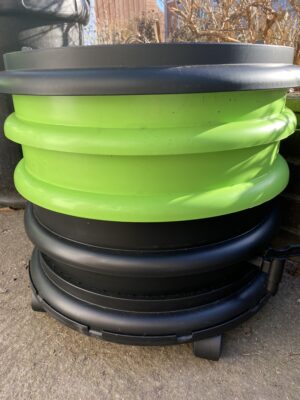
Different types of wormeries are available. Read my article which gives you a selection of choices, or watch video 8 showing you how I made a worm farm nursery. My working wormery is the Ferme Du Moutta (WormBox), consisting of a collection tray for the worm tea liquid, then above is a tray with pre-made bedding; the next two trays are filled with safe food waste. To begin a wormery, you need composting worms, bedding and (optional) feed; purchasing a starter pack from Amazon will give everything.
Points about worms:
- Garden earthworms live deep in garden soil and are unsuitable for worm composting
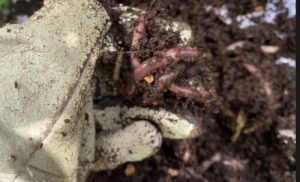
- Worms known as brandlings, tiger worms, dendras and red wigglers, etc., stay close to the soil surface and are suitable as composting worms
Worms will breed quickly. I started my wormery in February, and by April, my worms started reproducing, and on the bedding surface lay green-lemon worm cocoons. In about eight weeks, the cocoons will hatch if the temperature is suitable, with about three to five worms inside each. In my nursery, I have both cocoons and baby worms, and around two months later, when an adult, I will transfer to a large wormery created from a plastic tub.
One benefit of having a wormery is reducing household food waste and turning the organic matter into feed to keep plants healthy. The other benefit is if the process is learnt correctly, a side-line business can be achieved by selling worm castings, composting worms and worm feed. Overall, it’s about sustainability, reducing food waste, and self-satisfaction that you are contributing to a greener world.
Types of worms for a wormery
Here are the names you’ll notice when selecting composting worms:
- Red worms
- Red Wigglers
- Brandling worms
- Tiger worms
- Eisenia foetida
Places to purchase composting worms:
- Yorkshire Worms
- Wiggly Wigglers and receive a £2.50 coupon
- Worms Direct
Safe and prohibited foods for worms
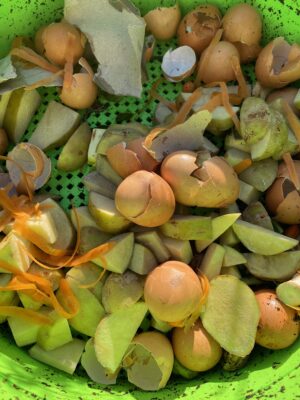
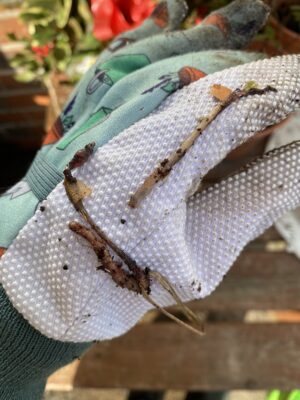
Organic materials are placed in a tray with a tray layer system like the Ferme Du Moutta, or if a DIY wormery, mix the food into the bedding. Occasionally, I tuck small pieces of banana (loved by worms) into the bedding and sprinkle crushed eggshells (grit for the digestive system) over the top.
If you purchased a starter pack, sprinkle a little feed across the bedding occasionally. This will help fatten up your worms, too.
The food in this image is from the early days – feed your worms smaller amounts tucked in the shredded newspaper.
Safe food scraps for your worms:
Carbon-rich material:
- Straw
- Dry grass
- Newspaper
- Paper
- Cardboard
Nitrogenous material:
- Vegetables
- Cereal (eg weetabix, bran flakes)
- Coffee grounds and filters
- Tea
- Fruit peels, cores
Breeding and digestion:
- Crushed eggshells (calcium food and helps reduce acid in your wormery)
Chop food scraps into small pieces to allow the worms to devour more efficiently, and a worm’s diet should consist of 50% greens (vegetable) and 50% browns (fruit), paper, and cardboard.
Prohibited food for your worms:
- Meat
- Sauce
- Citrus fruit
- Garlic
- Onion, leeks
- Fish
Giving your worms prohibited foods can lead to an unbalanced harmful PH level because of acidic conditions, health issues including String of Pearls or Sour Crop, skin irritation, and a smelly bin that will attract flies and vermin.
How often should you feed composting worms?
I made the mistake of initially overfeeding my composting worms at the beginning despite professionals’ advice not to feed them for the first two weeks. Letting them adjust to their new home environment is important first. At least four worms died.
Feeding worms appropriate food waste is essential. A worm will eat half its body weight in a day, and when beginning a wormery, it’s easy to overfill the food tray before the worm can consume what’s already been fed to them. Poor health and death can be the outcome otherwise.
Two points to remember when maintaining a healthy wormery:
- If hardly any food in the food waste tray, top it up with new food waste
- If the food waste tray is full, leave your worms to chomp through it
Harvesting worm castings and worm tea
Worm castings:
Harvesting worm castings is generally between 3 to 6 months from when you started your wormery. When it is time to harvest castings, stop feeding the worms for one to two weeks.
Harvesting steps:
1: Lay moist newspaper on a ground sheet, add fresh food and cover with another moist sheet of newspaper
2: By hand, remove any visible castings and put aside. Remove any worms and put them onto the moist newspaper. The worms should migrate to the food and hide beneath the newspaper, away from light
3: Remove other castings or sift the bedding
4: Clean the bedding tray, introduce 50% new and 50% old bedding, and use the rest to start a second bin. Introduce some fresh food into the new bedding and the fresh into the food tray. Return some worms to the wormery and the rest to the new second wormery.
In June, I harvested for the first time but approached the system differently to above. The outcome of having ‘black gold’ outreached my expectation too.
Worm juice (leachate):
Purchased wormeries or DIY versions have a tap at the base of the wormery. Again, it can take weeks or months to accumulate any liquid.
1: If you have a tiered wormery system like mine, worm tea will gather in the base where a tap is located
2: It can take a few months until the worm tea tray is full of liquid
3: Meanwhile, save any milk bottles, and clean them thoroughly
4: Drain any worm tea into the bottles, but when ready to use as fertiliser, you’ll need other empty bottles because it needs diluting as 1 part worm tea and 10 parts water
Another point to make you aware of is drowned worms:
Unfortunately, you may find drowned worms in the tea liquid if your worm bin resembles mine. The wormery has an interior moat and a raised central area in the tea tray. Because of the holes at the base of the bedding, worms crawl through and if filled with liquid, may die. I check the wormery often and return these worms to a safe tray; so far, none have drowned.
Common issues in a worm farm and how to troubleshoot

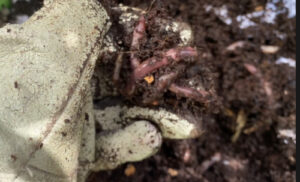
Worms clingy to the side of the wormery:
The image shows my worms in the early days -clinging to the sides of the wormery means they are unhappy with something inside.
Possibilities:
1: Protein poisoning / String of Pearls / Sour Crop
2: Bedding too dry or wet
3: Lack of oxygen (anaerobic)
4: Overfeeding
How to troubleshoot:
1: Foods with a high protein level can cause this if not balanced with calcium, causing the intestines to rupture. I balanced my wormery with crushed eggshells, which stops high acid conditions. Either can happen from overfeeding
- String of Pearls is when a worm looks pinched in various sections of its body. It’s from gas because overfed and food has fermented
- Sour Crop happens if worms are overfed and worms cannot eat it all. Uneaten food can ferment and become sour in an acidic environment
2: A wormery’s moisture content should range between 70% to 80%, and investing in a worm farm thermometer is recommended. This one is colour coded with five sections, clearly showing if worms are safe or in danger.
During hot climates, bedding may become too dry. Wet newspaper can be laid across the top of the bedding, and add moist watery fruit to a wormery food tray. Many fruits, salads and vegetables have a high water content. An example is watermelon at 92%. On the other hand, too much watery fruit and veggies can make bedding too wet. Look out for worms clingy to the side of the wormery as it means something is wrong inside
3: Worms breathe through their skin. Turn the bedding, and check moisture levels because if the bedding is too wet, the worms will face a lack of oxygen (anaerobic)
4: Wait until the worms have almost consumed all food scraps before adding more. Overfeeding can cause String of Pearls and Sour Crop, leading to death
Related articles
- The Worm Gang on YouTube
- Convert a wheelie bin or make a wooden wormery
- Getting started with a wormery
- Attract wild birds into your garden or balcony and keep them safe
- Get the kids to make a wildlife hotel this summer
Storing a wormery in Autumn and Winter
Follow The Worm Gang on YouTube as later in 2023, I’ll be showing you how to keep worms alive and safe in winter.
Depending on where you live, winter temperatures can dip very low. Admittedly, I left my wormery outside at -4 for two or three nights, and they survived, but any longer, my worms would have frozen. An indication of this was having found an escapee on the ground. Without the protection of the wormery and bedding, it freeze.
Protecting your worms from cold (or hot) temperatures is vital. Preferred bin temperatures are 15 to 25 degrees Celsius, with worms being most active between 10 to 30 Celsius – in ideal temperatures, the worm population can double in weeks.
Garage, shed or outbuilding
A garage, outbuilding or shed is ideal for a wormery during the winter. If a wall adjoins the house, store your wormery here as it will be warmer.
Outside
Find a sheltered corner, away from anywhere it can be blown over. Think of cover from snow, sleet or torrential rain.
Insulate your wormery from the outside using any of the following:
- Bubble wrap (Tescos sell for £2.75)
- **Old carpet
- **A blanket
- **Duvet
**These will get drenched in torrential rain.
Insulate your wormery from the inside:
- Layer will leaves but not too many (store from Autumn)
- Straw
- Cardboard
Whatever you choose, ensure your worms have ventilation and drainage.
Storing a wormery in the Spring and Summer
Garage, shed or outbuilding
A shed will overheat and become stifling, especially if windowless and without through air. Regardless of your chosen building, use a room thermometer to monitor the storage facility and a wormery thermometer to check the bin temperature.
If storing inside a garage or outbuilding, look at its construction and location. Is the building in direct sunlight and is the roofing made of polycarbonate or tin? It can heat up and be too hot for the worms.
Outside:
Avoid placing your wormery in direct sunlight and away from open areas to prevent being overturned during the gales. Opt for shady spots in a garden. My wormery sits slightly tucked beneath a bush by the house.
End note
We will make mistakes as we learn the correct procedures for maintaining a wormery, and some worms will die. Still, eventually, things will fall into place, and what you achieve will top-quality fertiliser and improved soil health. So please follow The Worm Gang on YouTube and comment.
Key takeaways
- Moisture levels must be checked
- Keep your wormery out of the sun
- Insulate your outdoor wormery in the cold months
- Feed them only safe foods
- Worms clingy to the walls are unhappy worms
- Crushed eggshells are a huge benefit in acidic conditions
Poppys Pets is a participant in Awin and Amazon Associate affiliate programs which compensates me for referring traffic. It is of no extra cost to you and if thinking of buying a product, please consider using my link. It\'ll earn Poppy\'s Pets a few pennies to continue to this website. Only a selection of articles and videos on this website and YouTube channel contains affiliate links. Further information: Disclaimer and Privacy Policy
Poppy’s Pets has a column in the Withernsea District and Community News.