My step-dad has a wormery and showing interest, he bought me the Ferme Du Moutta worm bin, which included coir bedding. The worms arrived soon after. Starting a wormery is a fantastic way to turn food scraps into nutrient-rich fertiliser for your garden and indoor plants through a natural process.
Using my experience, we shall look at the basics:
1: Setting up a wormery
2: Maintaining a wormery
3: Choosing the right worms
4: Feeding your worms the correct foods
Whilst there are many types of worm bins ranging in price, DIY plans, or creating a bin from a plastic tub to keep costs down, this article is based on the Ferme Du Moutta stacking bin but the foundation of worm composting covers all worm bins.
Watch my worm bin Videos: Stacking worm bin
Watch my DIY worm bin: Plastic tub bin
If composting worms live in a healthy bin, they will breed. This gives you enough worms to start a second bin.
If adverse to handling the worms, Bokashi composting, otherwise known as indoor composting, might be an option. This method allows you to compost all food types including cooked, uncooked and even unwanted pet food. Alternatively, indoor composting can exist alongside your worm bin to compost foods toxic to your worms.
Composting worms will give you nutrient-rich soil fertiliser and liquid fertiliser. The Bokashi bin liquid fertiliser can be used for your garden or as a drain cleaner, and the food contents are put into a dug-out hole in the garden, in which you can plant into two weeks later.
YouTube playlist: The Worm Gang
YouTube playlist: The Bokashi series
Read: Beginners Bokashi composting
Additional items you’ll need for your worm bin:
- Black and white newspaper or cardboard
- Waterproof gardening gloves or marigolds
- Bucket or tub with a wide base to soak a block of coir bedding
- Three litres of water to soak the coir bedding
- Empty milk cartons to collect the leachate
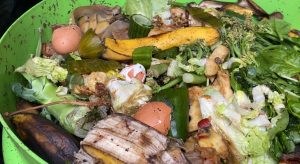
- Household food scraps
What is a wormery or worm bin?
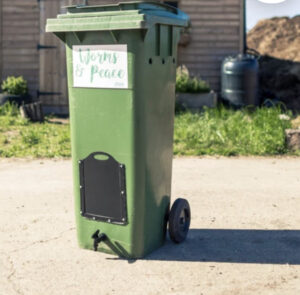
A wormery is also known as a worm bin and is available in different styles.
Stacking system – what does it consist of?
- Liquid collection tray with a drainage tap
- Bedding tray for coconut coir bedding
- Working tray for food and carbon materials (newspaper, grass, cardboard, straw etc)
Ferme Du Moutta direct from Worm Box: Stacking system
Stacking system from Wiggley Wrigglers: Various worm bins
£2.50 coupon from Wiggley Wrigglers: My referral link
Plastic tub – what does it consist of?
- A single plastic tub without drainage holes, or
- A DIY stacking system with one or more plastic tubs with the base as the drainage tray
- Optional drainage tap
Downloaded plans – what does it consist of?
- Downloadable blueprints to construct a worm bin
- List of tools and materials required
Read more on Etsy: DIY worm bin plans
Recyclable bins – what does it consist of?
- Normally made from recyclable products
- One compartment comprising of a joint bedding and working tray
- Drainage section with a tap
Read more on Etsy: Mini worm bin
A few important facts about a worm bin
1: Fruit and veg can release up to 80% moisture. If by squeezing a handful of bedding and water droplets appear, the bedding is moist. If water trickles down your arm, it is too wet.
Before applying this test, ensure no worms are mixed in with the bedding, or you might squash them!
Worms cannot survive in dry bedding and instead thrive in damp dark conditions.
If your worm bin is outside and has ventilation holes at the top, cover during the rain season to prevent too much rainfall from getting in the wormery.
Keep the bedding at a 70% to 80% moisture level. If opting for a single bin without drainage, food waste must be laid on cardboard or newspaper to soak up the high moisture levels.
2: Regardless of the bin type, composting worms need ventilation because they breathe through their skin. Without oxygen, the worms will die. To solve this, a worm bin must have ventilation holes at the top and sides of the bin.
3: There will be base holes in the working (food) tray and bedding (coir) tray to allow moisture to seep through and to allow the worms to move between trays.
The drainage tray does not have holes in the base. Instead, it will have a tap to drain off the leachate. The Ferme Du Moutta has a raised central area and outer moat in the drainage tray and every week I remove worms and return them to the bedding or working tray. Composting worms can drown in the drainage tray.
Watch the Video: Missing worms
Watch the series: Step-by-step worm bin
4: You must add 50% of carbon materials and 50% of fresh foods to balance the bin conditions. Carbon materials (newspaper, cardboard) will help absorb fruit and veg moisture and contribute towards stopping your bin from becoming too wet if monitored.
During the first two weeks of owning compost worms, do not overfeed. Put a little lettuce, or similar, in the tray.
5: Turn the bedding to aerate the contents as worms need oxygen to breathe. It is essential to turn regularly to create good bacteria too and stop the anaerobic bacteria.
6: Worms clinging to the sides of the bin indicate that the contents are too acidic or anaerobic (lack of oxygen). I believe this contributed to the death of four of my worms in the early days.
7: Compost worms are light-sensitive and will burrow to escape.
Watch the #Short: Worms escaping the light
8: The appearance of white pot worms suggests an imbalance in the bin – the contents may be wet or acidic.
Watch the Video: Getting rid of pot worms
8: I find flies are attracted to the bin contents during hot weather and if a lot of fruit is added.
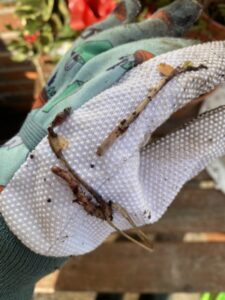
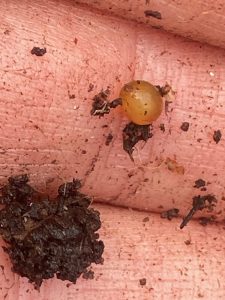
9: String of Pearls or sour crops can be caused by protein poisoning. This is caused by overfeeding or bin contents being too wet. To identify protein poisoning, a worm’s body will be deformed, swell or have a stringy effect and my image above shows this.
Remove the deceased worms, add plenty of newspaper or cardboard and consider an anti-acid lime-based product. I regularly add calcium-based crushed eggshells for pH balance. Remember to maintain a pH balance of 0.6 to 0.7.
Watch the Videos: Worms Died in the 1st Month -Was It String of Pearls?
Watch the Videos: Composting Wormery Mistakes – Learn From My Errors
Buy Anti Acid Lime from Wiggly Wigglers using my £2.50 discount coupon
10: Never overfeed during the first two weeks as they need to settle into their new environment and will not consume much. I feel this caused the death of some worms in the early days.
11: Weather conditions play a major part in creating a healthy bin with happy worms. Composting worms need a dark and damp environment, little noise, and insulation if outside in winter if temperatures are less than 4 degrees Celsius.
Subscribe to The Worm Gang on YouTube
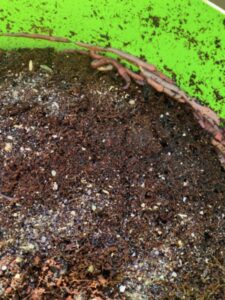
What are castings and what do I need to harvest?
In short, castings are worm poop! Another name is vermicomposting and this can be bought in garden centres but I love making my own.
Over time, organic food scraps will decay and composting worms will convert them into vermicompost or castings which have a lumpy appearance. Now it’s time to harvest the castings by scooping out sections onto the sieve. Moving it around, black nutritious fertiliser will fall through onto the sheet below. You’ll need to remove worms as you progress and replace them into the wormery – don’t forget composting worms are light sensitive so lay beneath wet newspaper if you aren’t returning to the tray immediately.
The fertiliser can be mixed or additional conditioner for potting so add conditioner to the soil.
Items needed to harvest the castings:
- A sieve with 3mm to 4mm holes
- A scoop to transfer converted food waste onto the sieve
- A sheet to lay beneath the sieve to catch the black gold or vermicompost – Tescos and Asda sell shower curtains for about £2.50
- A bucket to put the vermicompost into
How is fertiliser created with composting worms and food?
It might take a while to understand how the mechanics of food fed to composting worms is converted into beneficial food for your plants, and what the liquid is so hopefully the following clarifies the different names you’ll hear.
What is leachate and how do I make it?
Leachate is not worm tea, which was my mistake when I first started because I thought the liquid was the same. And it doesn’t pass through a worm’s digestive system either.
Fruit and veg had high water content; in fact, as much as 80% and can make the contents in your worm bin quite wet and unhealthy if not monitored and dealt with. The working tray in my stacking system is at the top, so water seepage from food drains down and is absorbed by the bedding. In turn, it makes the bedding tray heavy. The water will continue to seep down into the drainage tray – this is the leachate.
I check this tray weekly because worms crawl through the base holes and worms can drown.
Watch the Video: Worm rescue
The leachate liquid is full of nutrients and can be used on your plants by pouring around the base but it must be diluted first as 1 part leachate and 10 parts water.
Watch the #short: Liquid fertiliser from your worm bin
The working tray must consist of a 50/50 ration of fresh produce and carbon materials. By consistently supplying your specialised worms with fresh food waste, you’ll easily generate leachate or “worm juice or wee,” and soil fertiliser known as castings. Episode 11 of The Worm Gang series shows you how effective the liquid is.
What is worm tea and what do I need to make it?
- A porous bag – use a stocking or tights
- A bucket – B&Q orange buckets are £1
- Dechlorinated water – save rainwater or use pond water
- Sieved castings or ‘black gold’
Watch the video: Harvesting castings for black gold
Worm tea is made from castings instead of using the leachate in the drainage tray. I’ll be making worm tea fertiliser later in 2024 so please subscribe to my YouTube Channel.
The method is simple – castings are placed into a porous bag and tied, then soaked overnight in a bucket of dechlorinated water. The brown liquid fertiliser contains beneficial microbes and is a fabulous boost to plants and can be poured over every part of a plant. The bagged castings can be sprinkled into plant pots or in the garden.
Watch the Video: Food converted into Black Gold fertiliser
Watch the #Short: Good foods for composting worms
Watch the #Short: Bad foods for composting worms
Watch the #Short: Teabags are dangerous for your worms and us
What are the best composting worms?
The first point to make is composting worms are not earthworms.
The Ferme Du Moutta worm bin, bedding and composting worms were a gift from my Stepdad. If starting a worm bin, these are the worms to look for. Most businesses are on Etsy and Amazon.
It’s recommended you buy 2000 (500g) adult compost worms to start which speeds up for food conversion process. But if funds are low, start with 50g and add less food to the bedding or working tray. As long as the worm bin is healthy, composting worms will start laying eggs and before long the population will double.
Dendrobaena composting worms
“These are the Dendrobaena worms; they are good composters.”
Steve – Yorkshire Worms
Otherwise known as the European Nightcrawlers. I ordered 50g for my step-by-step worms bin, and the worms were chunky.
These worms are a reddish brown and you’ll notice a yellowy tail. They tolerate damper conditions and are adaptable to the environment.
European Nightcrawlers love living in a leaf and plant environment, hence the contents of my step-by-step worm bin are ideal for them. Of course, they enjoy food waste and newspaper materials, as much as Tiger Worms.
Little worms from newly hatched maroon-coloured eggs can be missed in your worm bin but grow quickly and around 20 weeks the worm will have reached maturity.
Watch the #Short: How compost worms arrive in the post
These composting worms are available on Etsy.
Red tiger worms / red wigglers
Otherwise known as Brandling Worms. Tiger worms are a reddish colour and smaller than European Nightcrawlers, and love munching at food waste which is converted into beneficial fertiliser. A Tiger Worm can lay an egg in around 10 days in a healthy bin and each egg may have four little worms.
Watch the #Short: Tiger worms going into their bedding
The worms in the #short above come from Yorkshire Worms. I purchased 50g and can be ordered from Etsy or Amazon.
Watch the Video: Types of composting worms in my bin
What do worm eggs look like?
Happy compost worms will reproduce quickly although I didn’t notice any eggs during the first few months, but at the time, I was unsure what I was looking for. If conditions are poor – the bin is too hot or cold, too wet or dry, or the pH balance is incorrect, worms will not reproduce. Worm eggs will be found in the bedding and working tray – I’ve rescued a few from the drainage tray too.
A breakdown of the reproduction cycle:
- Composting worms will mate around 50 to 90 days old
- They will mate together lying side by side
- A band around the worm is the clitellum
- The clitellum contains fertilised eggs
- From mating to egg hatching the period is around 4 weeks
- The cocoon protects each egg
- Each cocoon contains around 15 to 20 eggs
- Each egg contains around 20 little worms
What are the white worms in my worm bin?

Many first-time worm composters mistake a white pot worm for a baby worm, but as shown in the image above, they are not the same. White pot worms are harmless but will compete with food and similar to composting worms, grow in size. The arrival of pot worms should be taken as a hint that the bin environment has imbalances and we need to act fast.
What causes pot worms and are they beneficial in the worm bin?
- A wet worm bin
- Acidic environment
- Pot worms thrive in bin conditions that composting worms dislike
- They aerate the soil and eat the food scraps
- Pot worms will multiply
- Pot worms can create fertiliser
How to get rid of pot worms
Anti-acid lime is useful to correct the bin balance, or increasing the levels of carbon materials in your worm bin is equally as beneficial. So if you have a large quantity of white pot worms, it is vital to change and monitor your bin.
- Add more newspaper, cardboard, grass and other carbon materials
- Or sprinkle anti-acid lime pellets into each tray every 14 days – the pellets break down because they absorb moisture.
- Combined with carbon materials, add broken eggshells to offset the acidic conditions
- Try a slice of milk-soaked bread overnight in the worm bin to attract the white pot worms and remove in the morning
In August 2024 I shall be moving into my own home again and should white pot worms appear again, I’ll remove them using bread and milk and start a pot worm bin to create fertiliser so subscribe to my YouTube channel.
Watch the #Short: How to stop a wet worm bin that attracts pot worms
Watch the #Short: How to get rid of white pot worms
Watch the Video: Recommended product to prevent or get rid of white pot worms
Read more about anti-acid lime from Wiggly Wigglers and use my £2.50 off coupon
What household scraps can compost worms eat?

The list below shows safe and bad foods for your worms. It’s worth noting that bad foods can be added to your indoor composting bin, another source of garden fertiliser. In another article, we shall look at the pros and cons of the food types. For example, fruit can cause flies but with a weekly application, there is a way to combat this and my #short shows you how.
Visit Green Living
| Allowed | Avoid |
|---|---|
| Crushed Egg Shells | Fish |
| Fruit | Meat |
| Vegetables & potato peels | Garlic |
| Tea & Coffee Grounds (without the bags) | Onion |
| Cereal | Citrus/acid foods (oranges) |
| Paper, Newspaper & Card (exclude glossy materials) | Dish in a sauce containing more than 5% fat |
| Dry Grass (without pesticides) | Pet food |
| Straw |
Key Takeaways:
- Reduction in food waste
- Food waste is converted into soil fertiliser and liquid
- Education for the kids
- White worms are not baby-composting worms
- Eco-friendly and sustainable
Poppys Pets is a participant in Awin and Amazon Associate affiliate programs which compensates me for referring traffic. It is of no extra cost to you and if thinking of buying a product, please consider using my link. It\'ll earn Poppy\'s Pets a few pennies to continue to this website. Only a selection of articles and videos on this website and YouTube channel contains affiliate links. Further information: Disclaimer and Privacy Policy
Poppy’s Pets has a column in the Withersea District and Community News.
