Setting up your wormery before your worms arrive is crucial because you’ll need to transfer them from the delivery box to their new bedding right away. I learned this the hard way.
My stepdad ordered my first composting worms, which included three different types, though their names weren’t listed on the delivery note. When the worms arrived, they were in a ventilated box, clumped together in a bag of bedding. I opened the bag to let the worms breathe and planned to set up the Ferme Du Moutta (WormBox) the next morning.
I didn’t realise that composting worms love darkness and are sensitive to light. That night, several worms crawled out of the open bag and explored the dining room.
This experience taught me the importance of setting up the worm bin before the worms arrive and deciding where to place it.
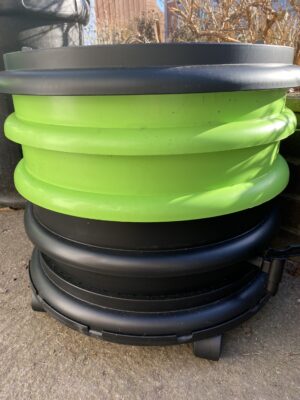
How to set up the WormBox Ferme Du Moutta
Accompanying the Ferme Du Moutta box is a booklet called Worm Composting Instructions in English (except for the diagram). Build the stacking system from the base upwards.
1: First, attach the four casters to the roller plate (base) using nuts and washers.
2: The first tray you add is the upturned cover, which has ventilation holes around the edge.
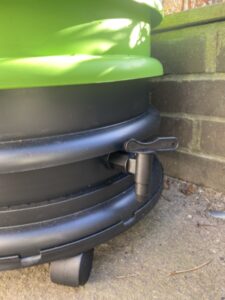
3: Next, attach the tap and washer to the liquid collection tray (drainage tray) before placing it on top of the upturned cover. For a quick and easy method of attaching the tap, watch my housekeeping video.
Watch the Video: Housekeeping the Ferme Du Moutta and an easy way to attach the tap
The leachate (liquid) will collect in the drainage tray and should be checked frequently and drained off. In the first few weeks, there won’t be much leachate, so I suggest collecting plastic bottles to store it.
Read my article Starting a Worm Bin: The Basics for more information on what leachate and worm tea are and how to collect them.
It’s important to note that composting worms eat less during the colder months, so you may not see much leachate until the weather warms up.
4: Next, place a coloured tray on top and cover the base with about three sheets of newspaper. This will be the bedding for the composting worms.
5: Add the second coloured tray on top—this is the working tray for household food waste.
6: Finally, add the second black cover with ventilation holes.
The top cover of the bin has ventilation holes that let the worms breathe, but these holes also allow rainwater in. If the bin gets too wet, the worms can drown, become ill, or attract white pot worms that compete for food. To prevent this, I place a tarp over the top of my Ferme Du Moutta bin, leaving a small section raised to ensure air can still circulate.
7: Put any spare coloured trays aside. Once the compost worms have settled and there are more food scraps, you can add the extra tray.
The WormBox Ferme Du Moutta is available in a selection of pretty colours and comes with an optional planter too. If this version is too costly, my article The Basics gives options from recycling to DIY worm bins which are lower priced. Alternatively, use a plastic tub to start a worm bin.
Watch the Video: Make a Worm Bin from a Plastic Tub
Watch the Video: The Great Worm Bin Flood – this shows you why location is important
How to set up coir bedding for composting worms
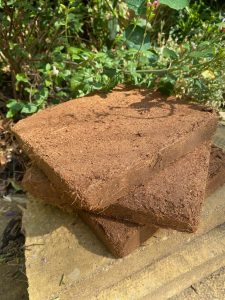
You can find starter packs that come with composting worms that include coir brick bedding and worm chow. Preparing the coir bedding is easy: all you need is a container and three litres of water. Pour the water over the coir blocks and let it sit for twenty-four hours. The coir will absorb all the water. I usually use tap water, but rainwater is a better option.
After the twenty-four hours, break up the coir bedding until it has a crumbly, soil-like texture. This is now ready for your worm bin and composting worms.
Coconut coir serves a dual purpose: it’s a habitat and food source for your worms. It’s 100% natural, but you need to monitor its moisture levels to maintain a balance. Initially, the bedding is lightweight, but it will get heavier as it retains moisture. When you add high-moisture food scraps to the working tray, the liquid will drip into the bedding. To counter this, add 50% carbon materials like newspaper and cardboard. These will absorb the excess liquid, but you’ll still find some leachate in the drainage tray. Adding carbon materials is crucial as they help your worms maintain a balanced environment, preventing heat, acidic conditions, and excessive moisture.
My bin has had some challenges recently, and my videos and #shorts show how I handled these issues.
Watch the #Short: How to dry out wet bedding
Watch the #Short: Help! My worm bin has white pot worms
What composting worms should you order?
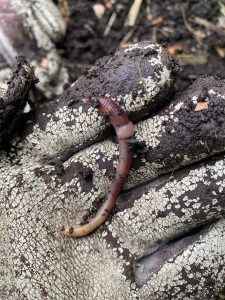
In numerous YouTube videos, you’ll often hear the term “red wigglers.” In the UK, we call them tiger worms, and they’re also known as branding worms. Another great option is Denbrobaena worms, which are just as effective. Both types have a large appetite and are excellent at producing fertiliser from decaying matter.
To start, consider buying 250g to 500g of composting worms, but you can also start with as little as 50g. Be sure to reduce the amount of food you add to the working tray initially, as overfeeding can harm your new worms.
After a few weeks, once your worms have settled into a healthy bin, they will begin reproducing. You’ll first notice small lemon-coloured balls, which are eggs. As they mature, these eggs will turn maroon, and soon you’ll see tiny reddish worms in the bin.
Please note: Baby worms are not white.
You’ll find composting worms available on Etsy, Amazon and independent websites. Using my referral link gives you £2.50 off from Wiggly Wigglers. Alternatively, you can buy a starter pack from Amazon consisting of worms, chow and bedding.
How to introduce compost worms to a new worm bin
When your composting worms arrive, they’ll be in a bag with their bedding, clumped together. To set up your worm bin, just empty the bag’s contents into the bin. You can spread the worms out yourself or let them move around independently. Cover them with the existing bedding in the bin, close the lid, and let them settle in.
Watch the #Short: How do composting worms arrive?
Watch the #Short: Introducing composting worms to a plastic worm bin
Why have my compost worms escaped?
It’s normal for worms to try and break for it from the wormery, but this usually only happens during the first few days. However, if an imbalance in the bin continues, composting worms will continue to escape and they can sliver between the sides of the trays to the exterior of the stacking system.
- The bedding is too dry. Composting worms breathe through their skin but they can dry out and die.
- A worm bin temperature should be between 15 to 25 degrees Celsius (59 to 77 degrees Fahrenheit. Compost worms will escape if the temperatures are incorrect.
- Investing in a pH meter is recommended to monitor the pH balance of your worm bin. I love this version with the worm images on! The ideal balance should be between 6.5 to 7.5.
- Ensuring the bin has enough ventilation holes will stop worms from escaping.
- Too much food is another reason compost worms may escape. Compost worms enjoy decaying matter but not rotting, stinky food.
- Too much acidic food in the worm bin. Egg shells or anti-acid lime can switch the balance
Two worms managed to escape the Ferme Du Moutta when stored outside. It was February with the temperatures in the minus figures. I found the worms the next morning frozen on the hard floor.
If storing your worm bin in a utility room, consider a lantern on through the night. Worms are light-sensitive and won’t want to escape.
Watch the Video: I recommend the Lepro 3 in 1 10W lantern. It’s also ideal for pets, camping, outrages, and winter at home instead of using electricity.
Where should I place my worm bin?
A garage is a good spot for your worm bin because it’s cool, not too hot, and sheltered from rain. Alternatively, place it in a shaded corner away from direct sunlight, wind, and noise. If your worm bin has ventilation holes at the top, make sure it’s covered to keep rainwater out. My stepdad uses wood for this, but I prefer tarpaulin since I can lift part of it to let air in. While a shed is fine in winter, it can get too hot in spring and summer.
Is it possible to kill worms by overfeeding?
Believe it or not, overfeeding can kills worms. Limit food for your new worms and be mindful in the future.
- Too much food can create heat in the worm bin and kill worms because the bin is too hot.
- Acidic food within the worm bin can cause sickness and death. An example of acidic food is tomatoes or citrus food.
- Overfeeding can cause protein poisoning.
- Too much food can cause excessive moisture and attract bugs and other pests
Worms eat half their body weight in a day and can survive several weeks without additional food scraps added.
Key Takeaways:
- Never overfeed compost worms
- Invest in a pH meter to monitor the balance of the worm bin
- It’s easy to make coir bedding
- Worms may escape in the days after being introduced into the new bin
- If worms continue to escape, there is an imbalance in the bin which must be rectified
- Denbrobaena worms have a huge appetite
Poppys Pets is a participant in Awin and Amazon Associate affiliate programs which compensates me for referring traffic. It is of no extra cost to you and if thinking of buying a product, please consider using my link. It\'ll earn Poppy\'s Pets a few pennies to continue to this website. Only a selection of articles and videos on this website and YouTube channel contains affiliate links. Further information: Disclaimer and Privacy Policy